 Github
 Projects
 Games
Games Articles
Procedurally Generating Wrapping World Maps in Unity C# – Part 3
Table of Contents
Check out Part 1 and Part 2 of this series if you haven’t already. This is a continuation of that article.
In the previous articles:
- Introduction
- Noise Generation
- Getting Started
- Generating the Height Map
- Wrapping the Map on One Axis
- Wrapping the Map on Both Axis
- Finding Neighbors
- Bitmasking
- Flood Filling
In this article (Part 3):
In Part 4:
Generating the Heat Map
A heat map defines the temperature of our generated world. The heat map we are going to create will be based on latitude and height. The latitude portion, can be done with a simple noise gradient. The Accidental Noise library provides us with this function:
ImplicitGradient gradient = new ImplicitGradient (1, 1, 1, 0, 1, 1, 1, 1, 1, 1, 1, 1);
Since we are wrapping the world, we only need a single gradient on the y-axis as our heat gradient.
We can add a new function in the TextureGenerator class, to generate a Heat Map texture. This will allow us to visually see what we are doing with the heat map:
	public static Texture2D GetHeatMapTexture(int width, int height, Tile[,] tiles)
	{
		var texture = new Texture2D(width, height);
		var pixels = new Color[width * height];

		for (var x = 0; x < width; x++)
		{
			for (var y = 0; y < height; y++)
			{
				pixels[x + y * width] = Color.Lerp(Color.blue, Color.red, tiles[x,y].HeatValue);

				//darken the color if a edge tile
				if (tiles[x,y].Bitmask != 15)
					pixels[x + y * width] = Color.Lerp(pixels[x + y * width], Color.black, 0.4f);
			}
		}

		texture.SetPixels(pixels);
		texture.wrapMode = TextureWrapMode.Clamp;
		texture.Apply();
		return texture;
	}
Our heat gradient ends up looking like this:
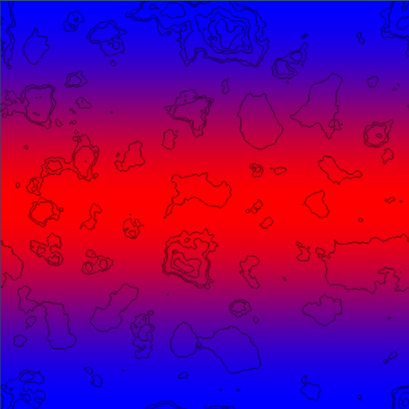
This data is a great start, as we want to have a warm band in the center of the map, similar to the equator on earth. This will the the base heat map we will build off of.
The next thing we want to do, is define HeatType zones, similar to how we defined HeightType zones in the previous part of this tutorial.
public enum HeatType
{
	Coldest,
	Colder,
	Cold,
	Warm,
	Warmer,
	Warmest
}
These HeatTypes will be adjustable from the Unity inspector, with the help of a few new variables:
	float ColdestValue = 0.05f;
	float ColderValue = 0.18f;
	float ColdValue = 0.4f;
	float WarmValue = 0.6f;
	float WarmerValue = 0.8f;
In LoadTiles, we set the HeatType of each tile, based on its heat value.
// set heat type
if (heatValue < ColdestValue)
    t.HeatType = HeatType.Coldest;
else if (heatValue < ColderValue)
    t.HeatType = HeatType.Colder;
else if (heatValue < ColdValue)
    t.HeatType = HeatType.Cold;
else if (heatValue < WarmValue)
    t.HeatType = HeatType.Warm;
else if (heatValue < WarmerValue)
    t.HeatType = HeatType.Warmer;
else
    t.HeatType = HeatType.Warmest;
Finally, we will add some new colors, for each HeatType in our TextureGenerator class:
	// Height Map Colors
	private static Color Coldest = new Color(0, 1, 1, 1);
	private static Color Colder = new Color(170/255f, 1, 1, 1);
	private static Color Cold = new Color(0, 229/255f, 133/255f, 1);
	private static Color Warm = new Color(1, 1, 100/255f, 1);
	private static Color Warmer = new Color(1, 100/255f, 0, 1);
	private static Color Warmest = new Color(241/255f, 12/255f, 0, 1);

	public static Texture2D GetHeatMapTexture(int width, int height, Tile[,] tiles)
	{
		var texture = new Texture2D(width, height);
		var pixels = new Color[width * height];

		for (var x = 0; x < width; x++)
		{
			for (var y = 0; y < height; y++)
			{
				switch (tiles[x,y].HeatType)
				{
				case HeatType.Coldest:
					pixels[x + y * width] = Coldest;
					break;
				case HeatType.Colder:
					pixels[x + y * width] = Colder;
					break;
				case HeatType.Cold:
					pixels[x + y * width] = Cold;
					break;
				case HeatType.Warm:
					pixels[x + y * width] = Warm;
					break;
				case HeatType.Warmer:
					pixels[x + y * width] = Warmer;
					break;
				case HeatType.Warmest:
					pixels[x + y * width] = Warmest;
					break;
				}

				//darken the color if a edge tile
				if (tiles[x,y].Bitmask != 15)
					pixels[x + y * width] = Color.Lerp(pixels[x + y * width], Color.black, 0.4f);
			}
		}

		texture.SetPixels(pixels);
		texture.wrapMode = TextureWrapMode.Clamp;
		texture.Apply();
		return texture;
	}
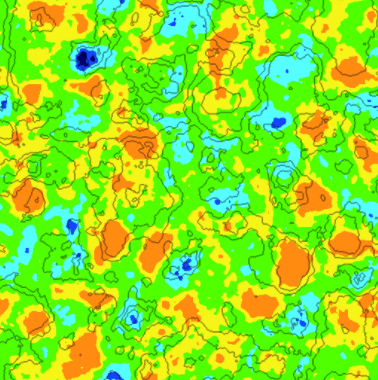
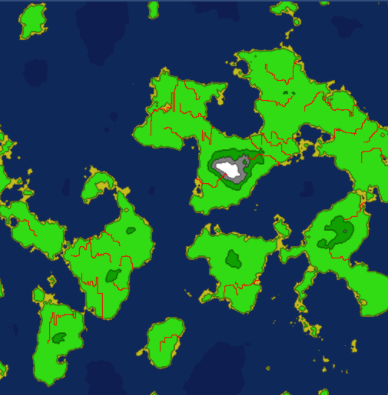
Generating this heat texture, now gives us the following:

We can now clearly see our defined HeatType zones. This data, however, is still just bands. It doesn't provide us with anything but latitude based heat data. Since temperature in the real world is reliant on a multitude of factors, we are going to blend in some fractal noise with this gradient noise.
We will add a couple of new variables to our Generator, and a new Fractal:
int HeatOctaves = 4;
double HeatFrequency = 3.0;


private void Initialize()
{
	// Initialize the Heat map
	ImplicitGradient gradient  = new ImplicitGradient (1, 1, 1, 0, 1, 1, 1, 1, 1, 1, 1, 1);
	ImplicitFractal heatFractal = new ImplicitFractal(FractalType.MULTI,
													  BasisType.SIMPLEX,
													  InterpolationType.QUINTIC,
													  HeatOctaves,
													  HeatFrequency,
													  Seed);

        // Combine the gradient with our heat fractal
	HeatMap = new ImplicitCombiner (CombinerType.MULTIPLY);
	HeatMap.AddSource (gradient);
	HeatMap.AddSource (heatFractal);
}
By combining the fractal with the gradient using a Multiply operation, the resulting noise gets multiplied based on the latitude. The Multiply operation is illustrated below:
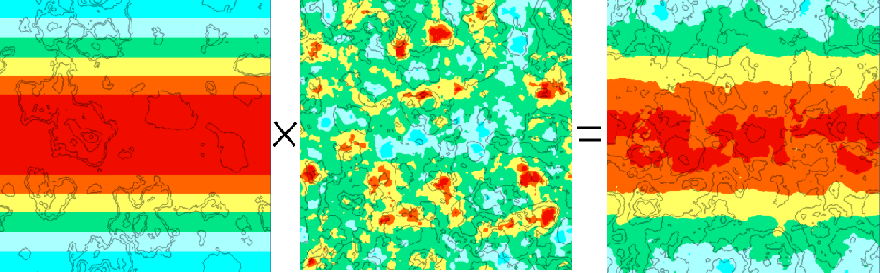
Gradient noise on the left, fractal noise in the middle, result of the Multiply operation on the right. As you can see, we now have a much nicer, less bandy heat map.
That takes care of the latitude portion. Next, we need to take the height map into consideration. We want our tallest mountaintops to be cold. The adjustment can easily be done in the LoadTiles function:
// Adjust Heat Map based on Height - Higher == colder
if (t.HeightType == HeightType.Grass) {
	HeatData.Data[t.X, t.Y] -= 0.1f * t.HeightValue;
}
else if (t.HeightType == HeightType.Forest) {
	HeatData.Data[t.X, t.Y] -= 0.2f * t.HeightValue;
}
else if (t.HeightType == HeightType.Rock) {
	HeatData.Data[t.X, t.Y] -= 0.3f * t.HeightValue;
}
else if (t.HeightType == HeightType.Snow) {
	HeatData.Data[t.X, t.Y] -= 0.4f * t.HeightValue;
}
This adjustment gives us our final Heat Map, taking both latitude and height into consideration:

Generating the Moisture Map
The moisture map is similar to the heat map. We first generate a fractal to give us a random base. Then we adjust this data based on the height map.
We will go through the moisture code quickly, as it is very similar to the heat map code.
First, the Tile class is going to need a new MoistureType
public enum MoistureType
{
	Wettest,
	Wetter,
	Wet,
	Dry,
	Dryer,
	Dryest
}
The Generator class will need new exposed variables, for the Unity Inspector:
	int MoistureOctaves = 4;
	double MoistureFrequency = 3.0;
	float DryerValue = 0.27f;
	float DryValue = 0.4f;
	float WetValue = 0.6f;
	float WetterValue = 0.8f;
	float WettestValue = 0.9f;
The TextureGenerator is going to need a new MoistureMap generation function, and associated colors:
	//Moisture map
	private static Color Dryest = new Color(255/255f, 139/255f, 17/255f, 1);
	private static Color Dryer = new Color(245/255f, 245/255f, 23/255f, 1);
	private static Color Dry = new Color(80/255f, 255/255f, 0/255f, 1);
	private static Color Wet = new Color(85/255f, 255/255f, 255/255f, 1);
	private static Color Wetter = new Color(20/255f, 70/255f, 255/255f, 1);
	private static Color Wettest = new Color(0/255f, 0/255f, 100/255f, 1);
	public static Texture2D GetMoistureMapTexture(int width, int height, Tile[,] tiles)
	{
		var texture = new Texture2D(width, height);
		var pixels = new Color[width * height];

		for (var x = 0; x < width; x++)
		{
			for (var y = 0; y < height; y++)
			{
				Tile t = tiles[x,y];

				if (t.MoistureType == MoistureType.Dryest)
					pixels[x + y * width] = Dryest;
				else if (t.MoistureType == MoistureType.Dryer)
					pixels[x + y * width] = Dryer;
				else if (t.MoistureType == MoistureType.Dry)
					pixels[x + y * width] = Dry;
				else if (t.MoistureType == MoistureType.Wet)
					pixels[x + y * width] = Wet;
				else if (t.MoistureType == MoistureType.Wetter)
					pixels[x + y * width] = Wetter;
				else
					pixels[x + y * width] = Wettest;
			}
		}

		texture.SetPixels(pixels);
		texture.wrapMode = TextureWrapMode.Clamp;
		texture.Apply();
		return texture;
	}
Finally, our LoadTiles function will set a MoistureType based on its MoistureValue:
//Moisture Map Analyze
float moistureValue = MoistureData.Data[x,y];
moistureValue = (moistureValue - MoistureData.Min) / (MoistureData.Max - MoistureData.Min);
t.MoistureValue = moistureValue;

//set moisture type
if (moistureValue < DryerValue) t.MoistureType = MoistureType.Dryest;
else if (moistureValue < DryValue) t.MoistureType = MoistureType.Dryer;
else if (moistureValue < WetValue) t.MoistureType = MoistureType.Dry;
else if (moistureValue < WetterValue) t.MoistureType = MoistureType.Wet;
else if (moistureValue < WettestValue) t.MoistureType = MoistureType.Wetter;
else t.MoistureType = MoistureType.Wettest;
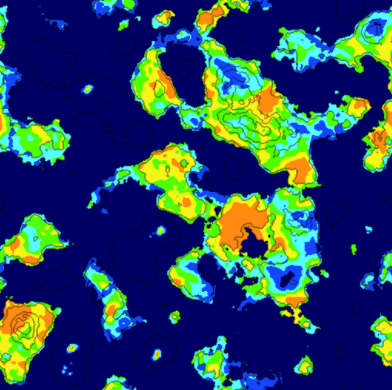
Rendering the initial noise for the MoistureMap, gives us the following:
The only thing left to do, is adjust the moisture map according to height map. We make the adjustment in the LoadTiles function:
//adjust moisture based on height
if (t.HeightType == HeightType.DeepWater) {
	MoistureData.Data[t.X, t.Y] += 8f * t.HeightValue;
}
else if (t.HeightType == HeightType.ShallowWater) {
	MoistureData.Data[t.X, t.Y] += 3f * t.HeightValue;
}
else if (t.HeightType == HeightType.Shore) {
	MoistureData.Data[t.X, t.Y] += 1f * t.HeightValue;
}
else if (t.HeightType == HeightType.Sand) {
	MoistureData.Data[t.X, t.Y] += 0.25f * t.HeightValue;
}
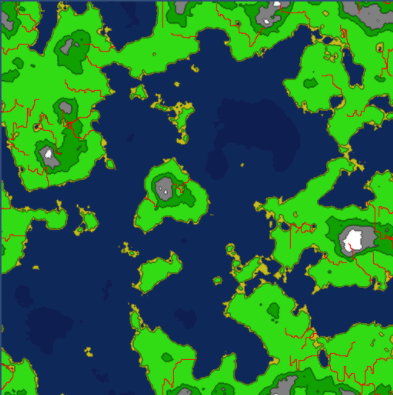
Since we now adjusted our moisture data based on the height of certain tiles, our updated moisture map looks a lot nicer:
Generating Rivers
The river generation method I will describe is really just a brute force attempt by my part, to make convincing looking rivers.
The first step of the algorithm, is to select a random tile on the map. The selected tile must be land, and must also have a height value that is over a specified threshold.
From this tile, we determine which neighboring tile is the lowest, and navigate towards it. We create a path in this fashion, until a water tile is reached.
If the generated path meets our criterias (river length, number of turns, number of intersections), we save the path for later use.
Otherwise, we discard the path, and try again. The following code gets us started:
private void GenerateRivers()
{
	int attempts = 0;
	int rivercount = RiverCount;
	Rivers = new List<River> ();

	// Generate some rivers
	while (rivercount > 0 && attempts < MaxRiverAttempts) {

		// Get a random tile
		int x = UnityEngine.Random.Range (0, Width);
		int y = UnityEngine.Random.Range (0, Height);
		Tile tile = Tiles[x,y];

		// validate the tile
		if (!tile.Collidable) continue;
		if (tile.Rivers.Count > 0) continue;

		if (tile.HeightValue > MinRiverHeight)
		{
			// Tile is good to start river from
			River river = new River(rivercount);

			// Figure out the direction this river will try to flow
			river.CurrentDirection = tile.GetLowestNeighbor ();

			// Recursively find a path to water
			FindPathToWater(tile, river.CurrentDirection, ref river);

			// Validate the generated river
			if (river.TurnCount < MinRiverTurns || river.Tiles.Count < MinRiverLength || river.Intersections > MaxRiverIntersections)
			{
				//Validation failed - remove this river
				for (int i = 0; i < river.Tiles.Count; i++)
				{
					Tile t = river.Tiles[i];
					t.Rivers.Remove (river);
				}
			}
			else if (river.Tiles.Count >= MinRiverLength)
			{
				//Validation passed - Add river to list
				Rivers.Add (river);
				tile.Rivers.Add (river);
				rivercount--;
			}
		}
		attempts++;
	}
}
The recursive FindPathToWater() function, determines the best path to take based on the terrain height, existing rivers, and its preferred direction. It will eventually find a water tile. We recursively call the function until the path is complete.
private void FindPathToWater(Tile tile, Direction direction, ref River river)
{
	if (tile.Rivers.Contains (river))
		return;

	// check if there is already a river on this tile
	if (tile.Rivers.Count > 0)
		river.Intersections++;

	river.AddTile (tile);

	// get neighbors
	Tile left = GetLeft (tile);
	Tile right = GetRight (tile);
	Tile top = GetTop (tile);
	Tile bottom = GetBottom (tile);

	float leftValue = int.MaxValue;
	float rightValue = int.MaxValue;
	float topValue = int.MaxValue;
	float bottomValue = int.MaxValue;

	// query height values of neighbors
	if (left.GetRiverNeighborCount(river) < 2 && !river.Tiles.Contains(left))
		leftValue = left.HeightValue;
	if (right.GetRiverNeighborCount(river) < 2 && !river.Tiles.Contains(right))
		rightValue = right.HeightValue;
	if (top.GetRiverNeighborCount(river) < 2 && !river.Tiles.Contains(top))
		topValue = top.HeightValue;
	if (bottom.GetRiverNeighborCount(river) < 2 && !river.Tiles.Contains(bottom))
		bottomValue = bottom.HeightValue;

	// if neighbor is existing river that is not this one, flow into it
	if (bottom.Rivers.Count == 0 && !bottom.Collidable)
		bottomValue = 0;
	if (top.Rivers.Count == 0 && !top.Collidable)
		topValue = 0;
	if (left.Rivers.Count == 0 && !left.Collidable)
		leftValue = 0;
	if (right.Rivers.Count == 0 && !right.Collidable)
		rightValue = 0;

	// override flow direction if a tile is significantly lower
	if (direction == Direction.Left)
		if (Mathf.Abs (rightValue - leftValue) < 0.1f)
			rightValue = int.MaxValue;
	if (direction == Direction.Right)
		if (Mathf.Abs (rightValue - leftValue) < 0.1f)
			leftValue = int.MaxValue;
	if (direction == Direction.Top)
		if (Mathf.Abs (topValue - bottomValue) < 0.1f)
			bottomValue = int.MaxValue;
	if (direction == Direction.Bottom)
		if (Mathf.Abs (topValue - bottomValue) < 0.1f)
			topValue = int.MaxValue;

	// find mininum
	float min = Mathf.Min (Mathf.Min (Mathf.Min (leftValue, rightValue), topValue), bottomValue);

	// if no minimum found - exit
	if (min == int.MaxValue)
		return;

	//Move to next neighbor
	if (min == leftValue) {
		if (left.Collidable)
		{
			if (river.CurrentDirection != Direction.Left){
				river.TurnCount++;
				river.CurrentDirection = Direction.Left;
			}
			FindPathToWater (left, direction, ref river);
		}
	} else if (min == rightValue) {
		if (right.Collidable)
		{
			if (river.CurrentDirection != Direction.Right){
				river.TurnCount++;
				river.CurrentDirection = Direction.Right;
			}
			FindPathToWater (right, direction, ref river);
		}
	} else if (min == bottomValue) {
		if (bottom.Collidable)
		{
			if (river.CurrentDirection != Direction.Bottom){
				river.TurnCount++;
				river.CurrentDirection = Direction.Bottom;
			}
			FindPathToWater (bottom, direction, ref river);
		}
	} else if (min == topValue) {
		if (top.Collidable)
		{
			if (river.CurrentDirection != Direction.Top){
				river.TurnCount++;
				river.CurrentDirection = Direction.Top;
			}
			FindPathToWater (top, direction, ref river);
		}
	}
}
After running this river path generation process, we are left with a bunch of paths that lead to water. This resembles the following:
A lot of the paths intersect, and if we were to dig these rivers out now, they might look a little strange if their sizes didn't match up at the point of intersection. Because of this, we are going to need to determine which rivers are intersecting, and group them together.
We will need a RiverGroup class:
public class RiverGroup
{
    public List<River> Rivers = new List<River>();
}
And the code to group the river paths together, if they intersect:
private void BuildRiverGroups()
{
	//loop each tile, checking if it belongs to multiple rivers
	for (var x = 0; x < Width; x++) {
		for (var y = 0; y < Height; y++) {
			Tile t = Tiles[x,y];

			if (t.Rivers.Count > 1)
			{
				// multiple rivers == intersection
				RiverGroup group = null;

				// Does a rivergroup already exist for this group?
				for (int n=0; n < t.Rivers.Count; n++)
				{
					River tileriver = t.Rivers[n];
					for (int i = 0; i < RiverGroups.Count; i++)
					{
						for (int j = 0; j < RiverGroups[i].Rivers.Count; j++)
						{
							River river = RiverGroups[i].Rivers[j];
							if (river.ID == tileriver.ID)
							{
								group = RiverGroups[i];
							}
							if (group != null) break;
						}
						if (group != null) break;
					}
					if (group != null) break;
				}

				// existing group found -- add to it
				if (group != null)
				{
					for (int n=0; n < t.Rivers.Count; n++)
					{
						if (!group.Rivers.Contains(t.Rivers[n]))
							group.Rivers.Add(t.Rivers[n]);
					}
				}
				else   //No existing group found - create a new one
				{
					group = new RiverGroup();
					for (int n=0; n < t.Rivers.Count; n++)
					{
						group.Rivers.Add(t.Rivers[n]);
					}
					RiverGroups.Add (group);
				}
			}
		}
	}
}
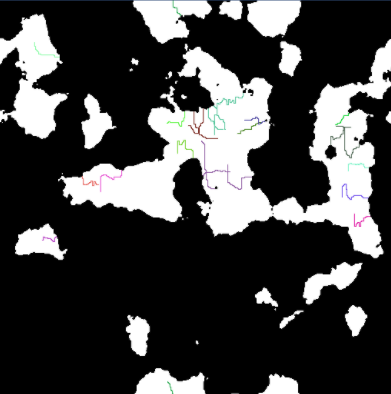
Now, we have a groups of rivers, that intersect, leading to water. Rendering these groups of rivers looks like the following, each group represented by a random color:
With this information, we can start digging out the rivers. For each river group, we first start by digging out the longest river in the group. The remaining rivers in the group are dug out based off this longest route.
The following code shows us how we start digging out the river groups:
private void DigRiverGroups()
{
	for (int i = 0; i < RiverGroups.Count; i++) {

		RiverGroup group = RiverGroups[i];
		River longest = null;

		//Find longest river in this group
		for (int j = 0; j < group.Rivers.Count; j++)
		{
			River river = group.Rivers[j];
			if (longest == null)
				longest = river;
			else if (longest.Tiles.Count < river.Tiles.Count)
				longest = river;
		}

		if (longest != null)
		{
			//Dig out longest path first
			DigRiver (longest);

			for (int j = 0; j < group.Rivers.Count; j++)
			{
				River river = group.Rivers[j];
				if (river != longest)
				{
					DigRiver (river, longest);
				}
			}
		}
	}
}
The code to dig out a river is a little more complicated, as it attempts to randomize as many parameters as possible.
It is also important for the rivers to widen as it approaches water. The DigRiver() code isn't pretty, but it does its job:
private void DigRiver(River river)
{
	int counter = 0;

	// How wide are we digging this river?
	int size = UnityEngine.Random.Range(1,5);
	river.Length = river.Tiles.Count;

	// randomize size change
	int two = river.Length / 2;
	int three = two / 2;
	int four = three / 2;
	int five = four / 2;

	int twomin = two / 3;
	int threemin = three / 3;
	int fourmin = four / 3;
	int fivemin = five / 3;

	// randomize lenght of each size
	int count1 = UnityEngine.Random.Range (fivemin, five);
	if (size < 4) {
		count1 = 0;
	}
	int count2 = count1 + UnityEngine.Random.Range(fourmin, four);
	if (size < 3) {
		count2 = 0;
		count1 = 0;
	}
	int count3 = count2 + UnityEngine.Random.Range(threemin, three);
	if (size < 2) {
		count3 = 0;
		count2 = 0;
		count1 = 0;
	}
	int count4 = count3 + UnityEngine.Random.Range (twomin, two);

	// Make sure we are not digging past the river path
	if (count4 > river.Length) {
		int extra = count4 - river.Length;
		while (extra > 0)
		{
			if (count1 > 0) { count1--; count2--; count3--; count4--; extra--; }
			else if (count2 > 0) { count2--; count3--; count4--; extra--; }
			else if (count3 > 0) { count3--; count4--; extra--; }
			else if (count4 > 0) { count4--; extra--; }
		}
	}

	// Dig it out
	for (int i = river.Tiles.Count - 1; i >= 0 ; i--)
	{
		Tile t = river.Tiles[i];

		if (counter < count1) {
			t.DigRiver (river, 4);
		}
		else if (counter < count2) {
			t.DigRiver (river, 3);
		}
		else if (counter < count3) {
			t.DigRiver (river, 2);
		}
		else if ( counter < count4) {
			t.DigRiver (river, 1);
		}
		else {
			t.DigRiver(river, 0);
		}
		counter++;
	}
}
Digging out these rivers, provides us with something that looks like this:
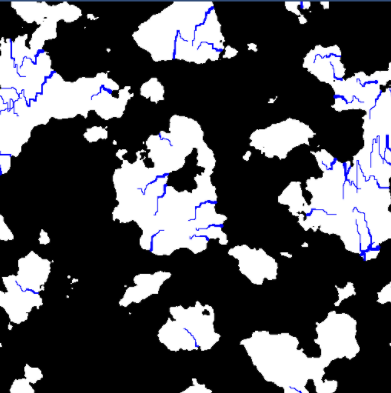
This provides us with some somewhat convincing rivers, however, we still need to make sure they provide moisture to our map. The rivers would not appear in a desert area, therefore, we need to make sure that the area around the rivers are not dry.
To facilitate this process, we add a new function, to adjust the moisture map based on our river data.
private void AdjustMoistureMap()
{
	for (var x = 0; x < Width; x++) {
		for (var y = 0; y < Height; y++) {

			Tile t = Tiles[x,y];
			if (t.HeightType == HeightType.River)
			{
				AddMoisture (t, (int)60);
			}
		}
	}
}
The moisture that is added varies, based on the distance of the originating tile. The further away from the river, the less moisture a tile will receive.
private void AddMoisture(Tile t, int radius)
{
	int startx = MathHelper.Mod (t.X - radius, Width);
	int endx = MathHelper.Mod (t.X + radius, Width);
	Vector2 center = new Vector2(t.X, t.Y);
	int curr = radius;

	while (curr > 0) {

		int x1 = MathHelper.Mod (t.X - curr, Width);
		int x2 = MathHelper.Mod (t.X + curr, Width);
		int y = t.Y;

		AddMoisture(Tiles[x1, y], 0.025f / (center - new Vector2(x1, y)).magnitude);

		for (int i = 0; i < curr; i++)
		{
			AddMoisture (Tiles[x1, MathHelper.Mod (y + i + 1, Height)], 0.025f / (center - new Vector2(x1, MathHelper.Mod (y + i + 1, Height))).magnitude);
			AddMoisture (Tiles[x1, MathHelper.Mod (y - (i + 1), Height)], 0.025f / (center - new Vector2(x1, MathHelper.Mod (y - (i + 1), Height))).magnitude);

			AddMoisture (Tiles[x2, MathHelper.Mod (y + i + 1, Height)], 0.025f / (center - new Vector2(x2, MathHelper.Mod (y + i + 1, Height))).magnitude);
			AddMoisture (Tiles[x2, MathHelper.Mod (y - (i + 1), Height)], 0.025f / (center - new Vector2(x2, MathHelper.Mod (y - (i + 1), Height))).magnitude);
		}
		curr--;
	}
}
Making this adjustment provides us with an updated moisture map, that takes the rivers into account. This will come in handy in the next section, when we start generating biomes.
The updated moisture map, looks like the following:
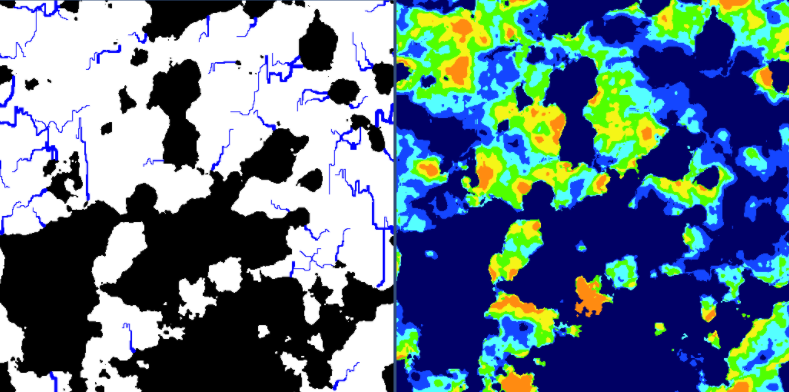
Stay tuned for Part 4. It will be the best part, as we are going to put all of these maps together and make a real world.
Source Code for Part 3 on github.
Continue to Part 4 of this series.
Purpose of startx and endx variables? Don’t seem to ever be used in AddMoisture method.