 Github
 Projects
 Games
Games Articles
Procedurally Generating Wrapping World Maps in Unity C# – Part 2
Table of Contents
Check out Part 1 of this series if you haven’t already. This is a continuation of that article.
In the previous article (Part 1):
In this article (Part 2):
- Wrapping the Map on One Axis
- Wrapping the Map on Both Axis
- Finding Neighbors
- Bitmasking
- Flood Filling
In Part 3:
In Part 4:
Wrapping the Map on One Axis
In part 1 of this tutorial, we set up a nice little framework to help us build up our maps. The Height Map we created previously, was not tileable.
This is because we sampled 2D noise data, which is not capable of providing us with what we need. If we want to make our world wrap around seamlessly, then we are going to need to add some dimension to our noise generator.
With 3D noise, we can sample data in a circular pattern, and the resulting 2D data will wrap on a single axis. The sampled data would resemble a cylinder in 3D space.
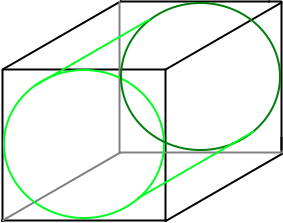
Imagine if we took this cylinder, cut it open, and laid it flat. This is essentially what we will be doing. The ends where we made the cut, would be able to join together seamlessly.
In order to do this, we need to modify the GetData function in our Generator class.
private void GetData(ImplicitModuleBase module, ref MapData mapData)
{
	mapData = new MapData (Width, Height);

	// loop through each x,y point - get height value
	for (var x = 0; x < Width; x++) {
		for (var y = 0; y < Height; y++) {

			//Noise range
			float x1 = 0, x2 = 1;
			float y1 = 0, y2 = 1;
			float dx = x2 - x1;
			float dy = y2 - y1;

			//Sample noise at smaller intervals
			float s = x / (float)Width;
			float t = y / (float)Height;

			// Calculate our 3D coordinates
			float nx = x1 + Mathf.Cos (s * 2 * Mathf.PI) * dx / (2 * Mathf.PI);
			float ny = x1 + Mathf.Sin (s * 2 * Mathf.PI) * dx / (2 * Mathf.PI);
			float nz = t;

			float heightValue = (float)HeightMap.Get (nx, ny, nz);

			// keep track of the max and min values found
			if (heightValue > mapData.Max)
				mapData.Max = heightValue;
			if (heightValue < mapData.Min)
				mapData.Min = heightValue;

			mapData.Data [x, y] = heightValue;
		}
	}
}
Running this code, then gives us a nice texture, that wraps on the x-axis:
Wrapping the Map on Both Axis
In order to get our map to wrap around both axis, we need to start sampling 4D noise. This concept is a little more difficult to grasp, as our minds have a hard time thinking in 4 dimensions, but is very similar to the 3D example.
Instead of having a single cylinder, you would have two cylinders connected together, in a 4D space.
Keep in mind, that sampling 4D data takes a lot longer than sampling 2D data.
Our updated GetData() function would then look like this:
private void GetData(ImplicitModuleBase module, ref MapData mapData)
{
	mapData = new MapData (Width, Height);

	// loop through each x,y point - get height value
	for (var x = 0; x < Width; x++) {
		for (var y = 0; y < Height; y++) {

			// Noise range
			float x1 = 0, x2 = 2;
			float y1 = 0, y2 = 2;
			float dx = x2 - x1;
			float dy = y2 - y1;

			// Sample noise at smaller intervals
			float s = x / (float)Width;
			float t = y / (float)Height;

			// Calculate our 4D coordinates
			float nx = x1 + Mathf.Cos (s*2*Mathf.PI) * dx/(2*Mathf.PI);
			float ny = y1 + Mathf.Cos (t*2*Mathf.PI) * dy/(2*Mathf.PI);
			float nz = x1 + Mathf.Sin (s*2*Mathf.PI) * dx/(2*Mathf.PI);
			float nw = y1 + Mathf.Sin (t*2*Mathf.PI) * dy/(2*Mathf.PI);

			float heightValue = (float)HeightMap.Get (nx, ny, nz, nw);

			// keep track of the max and min values found
			if (heightValue > mapData.Max) mapData.Max = heightValue;
			if (heightValue < mapData.Min) mapData.Min = heightValue;

			mapData.Data[x,y] = heightValue;
		}
	}
}
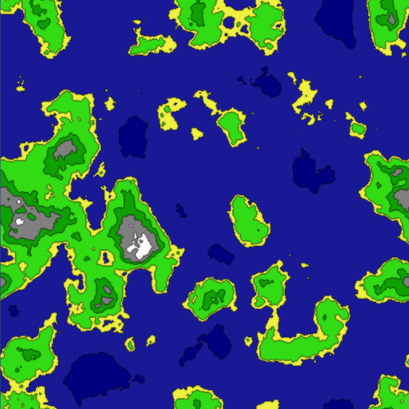
This code produces a seamless tileable texture, that is procedurally generated from 4D noise:
If you would like more information on how this works, have a look here and here.
Finding Neighbors
Now that we have a tileable Height Map, we are starting to get a lot closer to our goal. Now, we are going to shift focus towards the Tile class.
It would be very useful if each Tile object had a reference to each of its neighbors (top, bottom, left, right). This comes in handy for things, such as creating paths, bitmasking, or flood filling. We will touch on these aspects later on in this tutorial.
First thing we need to do, is create variables in our Tile class:
public Tile Left;
public Tile Right;
public Tile Top;
public Tile Bottom;
The next part is pretty straightforward. We simply run through every single tile, setting it’s neighboring tiles. First off, we will create a few functions inside of our Generator class, to simplify retrieving the Tile neighbors:
	private Tile GetTop(Tile t)
	{
		return Tiles [t.X, MathHelper.Mod (t.Y - 1, Height)];
	}
	private Tile GetBottom(Tile t)
	{
		return Tiles [t.X, MathHelper.Mod (t.Y + 1, Height)];
	}
	private Tile GetLeft(Tile t)
	{
		return Tiles [MathHelper.Mod(t.X - 1, Width), t.Y];
	}
	private Tile GetRight(Tile t)
	{
		return Tiles [MathHelper.Mod (t.X + 1, Width), t.Y];
	}
MathHelper.Mod() will wrap the x and y values for us, based on our Map width and height. This will ensure we never go off of our map.
Next, we also need to add the function that will do the neighbor assignments:
	private void UpdateNeighbors()
	{
		for (var x = 0; x < Width; x++)
		{
			for (var y = 0; y < Height; y++)
			{
				Tile t = Tiles[x,y];

				t.Top = GetTop(t);
				t.Bottom = GetBottom (t);
				t.Left = GetLeft (t);
				t.Right = GetRight (t);
			}
		}
	}
Visually, this doesn’t do much, yet. However, each Tile now knows who their neighbors are, which is very important for future steps.
Bitmasking
I decided to add this into the tutorial, mainly for aesthetic purposes. Bitmasking, in this context, is about assigning a value to each tile, based on it’s neighbors. Have a look at the following image:
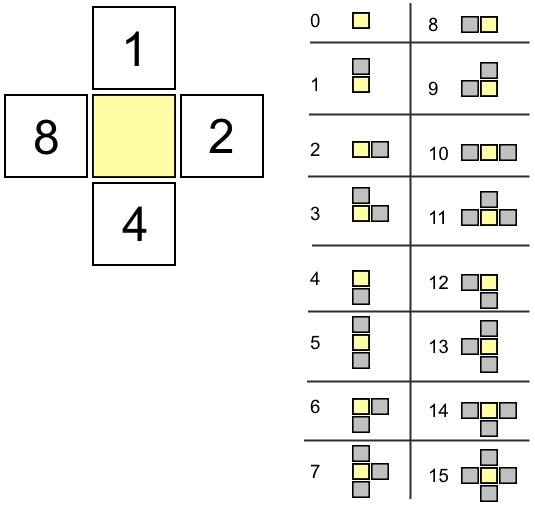
Based on a tile’s neighbors, we increment the bitmask as shown on the left side of the above image. All possibilities are illustrated on the right side. Note that each value is unique. This allows us to identify a block’s configuration very quickly.
The main benefit of bitmasking, is that you can then assign a texture, based on the bitmask value of each tile, making your maps a lot prettier and way less blocky when done properly.
Another benefit of bitmasking, is that if a Tile’s bitmask value is not equal to 15, then we know it is an edge tile.
Let’s add a function in our Tile class to do the calculation. We are only concerned with neighbors that share the same Height Type as the tile being analyzed.
	public void UpdateBitmask()
	{
		int count = 0;

		if (Top.HeightType == HeightType)
			count += 1;
		if (Right.HeightType == HeightType)
			count += 2;
		if (Bottom.HeightType == HeightType)
			count += 4;
		if (Left.HeightType == HeightType)
			count += 8;

		Bitmask = count;
	}
Since we already have references to the neighboring tiles, and we also have defined a HeightType, this calculation is quite trivial. Next, we add a function in our Generator class, in order to process this calculation for all of the tiles:
	private void UpdateBitmasks()
	{
		for (var x = 0; x < Width; x++) {
			for (var y = 0; y < Height; y++) {
				Tiles [x, y].UpdateBitmask ();
			}
		}
	}
Now, if we modify our TextureGenerator as follows:
//darken the color if a edge tile
if (tiles[x,y].Bitmask != 15)
	pixels[x + y * width] = Color.Lerp(pixels[x + y * width], Color.black, 0.4f);
We can now see a defined edge between our Height Types:
Flood Filling
It would be nice if we could determine a few things, such as:
- Where are the Lakes?
- Where are the Oceans?
- Where are the Land Masses?
- How big are each of these?
We can answer all of these question, with the help of a simple Flood Fill algorithm.
First, we are going to create an object, that will store information on our Tiles:
using UnityEngine;
using System.Collections.Generic;

public enum TileGroupType
{
	Water,
	Land
}

public class TileGroup  {

	public TileGroupType Type;
	public List<Tile> Tiles;

	public TileGroup()
	{
		Tiles = new List<Tile> ();
	}
}
The TileGroup class will hold a reference to a list of Tiles. It will also let us know if this particular group is Water or Land.
The main idea is to break down connected pieces of land and water into TileGroup collections.
We are also going to modify the Tile class slightly by adding two new variables:
	public bool Collidable;
	public bool FloodFilled;
Collidable will be set inside of the LoadTiles() method. Anything that is not a water tile, will have Collidable set to true. The FloodFilled variable will be used to keep track of which tiles have already been processed by the flood filling algorithm.
In order to add our flood fill algorithm to the Generator class. First we are going to need a couple of TileGroup variables:
	List<TileGroup> Waters = new List<TileGroup> ();
	List<TileGroup> Lands = new List<TileGroup> ();
Now we are ready to determine land and water masses in our map.
Since the map could potentially be very large, we cannot use a recursive flood fill, as it would easily produce stack overflow exceptions. Instead, we will need to use a non-recursive approach to solve this problem:
private void FloodFill()
{
	// Use a stack instead of recursion
	Stack<Tile> stack = new Stack<Tile>();

	for (int x = 0; x < Width; x++) {
		for (int y = 0; y < Height; y++) {

			Tile t = Tiles[x,y];

			//Tile already flood filled, skip
			if (t.FloodFilled) continue;

			// Land
			if (t.Collidable)
			{
				TileGroup group = new TileGroup();
				group.Type = TileGroupType.Land;
				stack.Push(t);

				while(stack.Count > 0) {
					FloodFill(stack.Pop(), ref group, ref stack);
				}

				if (group.Tiles.Count > 0)
					Lands.Add (group);
			}
			// Water
			else {
				TileGroup group = new TileGroup();
				group.Type = TileGroupType.Water;
				stack.Push(t);

				while(stack.Count > 0)	{
					FloodFill(stack.Pop(), ref group, ref stack);
				}

				if (group.Tiles.Count > 0)
					Waters.Add (group);
			}
		}
	}
}


private void FloodFill(Tile tile, ref TileGroup tiles, ref Stack<Tile> stack)
{
	// Validate
	if (tile.FloodFilled)
		return;
	if (tiles.Type == TileGroupType.Land && !tile.Collidable)
		return;
	if (tiles.Type == TileGroupType.Water && tile.Collidable)
		return;

	// Add to TileGroup
	tiles.Tiles.Add (tile);
	tile.FloodFilled = true;

	// floodfill into neighbors
	Tile t = GetTop (tile);
	if (!t.FloodFilled && tile.Collidable == t.Collidable)
		stack.Push (t);
	t = GetBottom (tile);
	if (!t.FloodFilled && tile.Collidable == t.Collidable)
		stack.Push (t);
	t = GetLeft (tile);
	if (!t.FloodFilled && tile.Collidable == t.Collidable)
		stack.Push (t);
	t = GetRight (tile);
	if (!t.FloodFilled && tile.Collidable == t.Collidable)
		stack.Push (t);
}
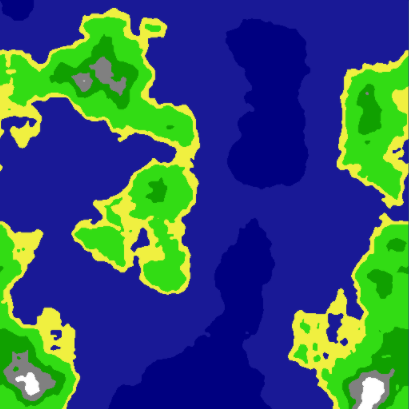
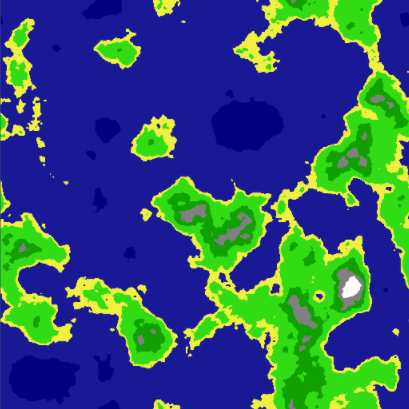
Using the above code, will separate all land and water masses and put them into TileGroups
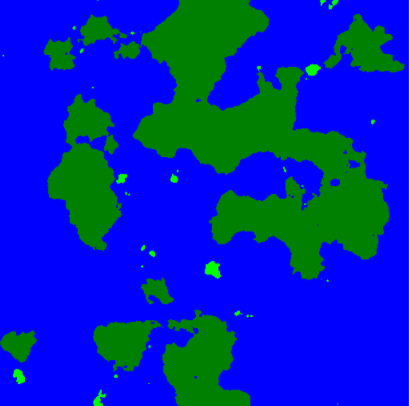
I generated a couple of textures to demonstrate how useful this data can be.
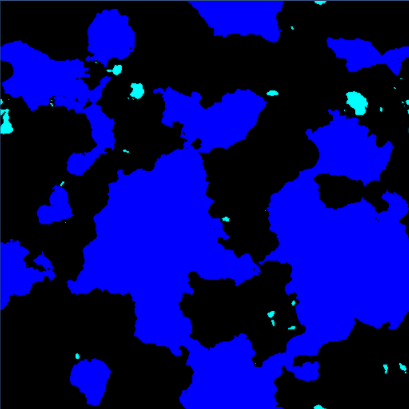
The left side image, all land tiles are all black. The ocean tiles are blue, and the lake tiles are cyan.
The right side image, all water tiles are blue. Large land masses are dark green, and islands in light green.
As you can see, we now have a lot more information on our generated map, and it effectively answers all of the questions we set out to answer.
Source code for Part 2 can be found here on github.
Continue to Part 3 of this series.
Great tut, how did you generate the flood filled textures?